
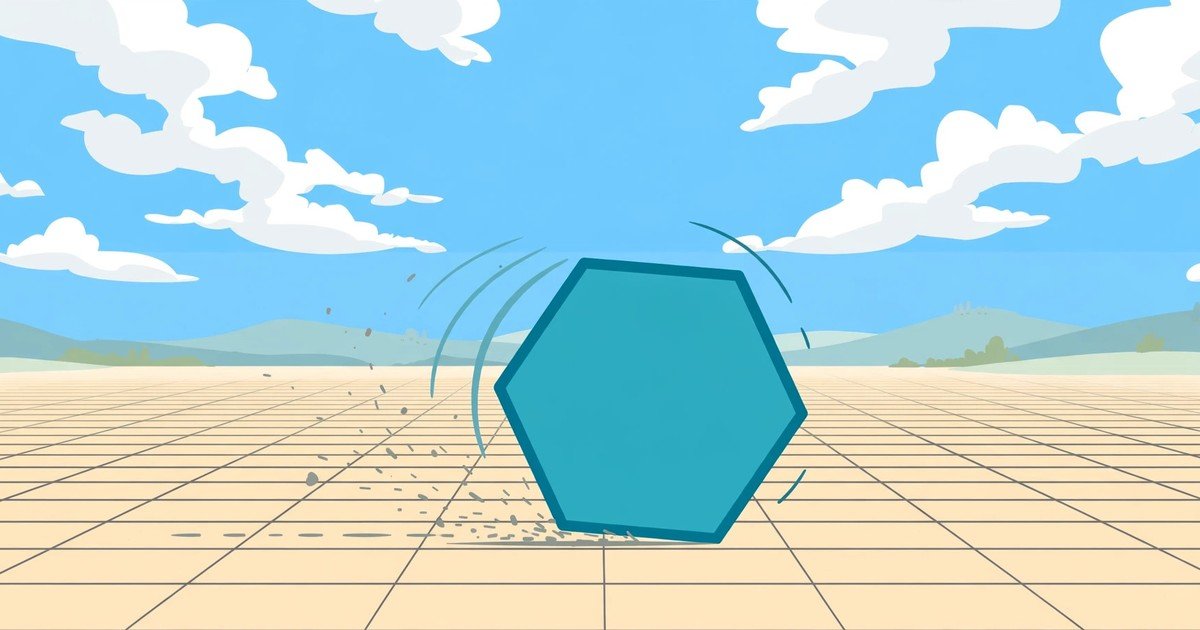
Rolling Polygon Tips to Cross Gaps Without Falling
By Somia Alex
Introduction
I am writing this for you if you keep falling in this game even though you understand the basic idea. I fell too, and my first fall taught me the most important lesson in this game. This blog is about Rolling Polygon, and the lesson is simple: this is not a fast reflex game. You do not win by moving quickly or by picking left or right at the last moment. You win by choosing the right number of sides before you press ROLL, so that the side of your polygon matches the gap exactly. In this blog I will show you how I read the board, how I match side to gap, when I use the Footprints preview, and how I protect my stars. I played the first six levels of Sky Grid myself, and every tip below comes from what I actually saw on those boards. If you follow the match rule first, your falls will drop fast, because you will stop guessing and start deciding with numbers.
Quick Answer
Read the Gap and Side numbers before you press ROLL. Change the side count until Side equals Gap exactly. Do not roll on a guess, because a fall costs one star and that star does not come back on retry. Use Footprints only when two side counts look close, because it also costs one star. Learn one level at a time in order, and review the fall message before your next try.
Key Takeaways
- The win rule is Side equals Gap, not speed.
- Fewer sides make longer sides, and more sides make shorter sides.
- A fall costs one star, and Footprints cost one star.
- Lost stars are not restored when you try again.
- Match first, roll second, every time.
How This Game Really Works
This game is turn based, and that changes everything. You do not drag the polygon and you do not steer it while it moves. You set its side count with the plus and minus buttons, from 3 to 12 sides, and then you press the red ROLL button. You can also use the Left Arrow for fewer sides, the Right Arrow for more sides, and Space for ROLL, and I verified those keys work. Once you press ROLL, the polygon rolls by itself, one side length forward at a time, landing each corner on the next stone until it reaches the finish platform or falls into a gap. During that roll, the plus, minus, and ROLL buttons are disabled. Each level shows a blue start platform, a row of blue stones separated by gaps, a red flag, and a yellow finish platform. Above the board you always see four numbers: Gap, which is the distance between stones, Side, which is the current side length of your polygon, Turn, which is how much it rotates per roll, and Angle, which is its corner angle. Your job is to make Side match Gap. When those two numbers match, every corner lands on a stone. When they do not match, a corner lands in a gap and you fall.
Best Practice 1: Match Side To Gap Before You Roll
This is the only practice that matters if you remember just one thing. Before every roll, look at Gap first and then look at Side. If Side is smaller than Gap, you need a longer side, so reduce the side count, because fewer sides make longer sides. If Side is larger than Gap, you need a shorter side, so increase the side count, because more sides make shorter sides. Do not press ROLL until the two numbers are equal. On Level 2, I learned this the hard way. I rolled with 7 sides, Side was 62.5, Gap was 101.8, and I fell on the first roll. The game told me I missed the stone by 13 units. I reduced the count to 4 sides, Side became 101.8, exactly equal to Gap, and the level cleared. That one change, from guessing to matching, is the difference between falling and finishing. Make matching a habit, and check the numbers every time, even on a level that looks easy.
Best Practice 2: Do Not Memorise A Shape Alone, Memorise The Rule
It is tempting to memorise that a square works or a hexagon works, but that alone will mislead you. The same shape gives a different Side on different levels, because the size of the polygon changes from level to level. In the levels I played, a hexagon solved Level 1 with Gap 80.0 and also solved Level 4 with Gap 60.0, because the polygon size was different. A square solved Level 2 and Level 5, both with Gap 101.8, and it also solved Level 3 with Gap 67.9. The shape is not the answer. The match is the answer. Always ask: does Side equal Gap on this board, right now? If the answer is yes, roll. If the answer is no, change the count and check again. Here are the verified solutions from my first six levels, so you can see the rule in action: Level 1, Gap 80.0, Hexagon with 6 sides. Level 2, Gap 101.8, Square with 4 sides. Level 3, Gap 67.9, Square with 4 sides. Level 4, Gap 60.0, Hexagon with 6 sides. Level 5, Gap 101.8, Square with 4 sides. Level 6, Gap 84.6, Pentagon with 5 sides. Use these as examples of the rule, not as a cheat list for later levels, because later levels will have different gaps and different polygon sizes.
Best Practice 3: Use Footprints As A Paid Check, Not As Your First Move
Footprints is a preview button on the right side of the board. When you use it, it shows green check marks on stones your corners will hit and red X marks where a corner will land in a gap. That preview is very useful, but it costs one star per level, and that star is gone for that level. My best practice is to match Side to Gap by numbers first, and only use Footprints when two side counts look close or when you are stuck and cannot decide. Do not use it on every level out of habit, because you will lose the chance at three stars before you even roll. Think of it like this: numbers are free, Footprints cost a star. Check the numbers first, use the preview second, and only when it will actually change your decision. On Level 2, Footprints confirmed what the numbers already said, with red X marks for the wrong count and green checks for the right count. That confirmation was useful once, but it would have been wasteful if I had used it on every level without checking numbers first.
Best Practice 4: Protect Your Stars, Because A Fall Costs More Than A Retry
Each level starts with three gold stars. A fall costs one star immediately, and using Footprints costs one star as well. The painful part is that lost stars are not restored when you press Try again. You return to the same level with the same side count you had, but with fewer stars. That means a guessed roll is not free. It is a star you cannot win back on that level. To earn three stars, you need to clear a level without a fall and without Footprints, according to the tutorial I saw. So my rule is simple: never roll on a guess. If Side does not equal Gap, change the count first. If you fall, do not rush the retry. Read the fall message first. It tells you how far you missed by, for example 13 units on my Level 2 fall, and it tells you to change the side count so every corner lands on a stone. Use that message to adjust in the right direction, check the numbers again, and only then roll. One careful roll protects more stars than three fast guesses.
Best Practice 5: Play In Order And Learn One Level At A Time
The Levels screen has five worlds: Sky, Jade, Amber, Violet, and Rose, with ten levels in each world. I played only the first six levels of Sky Grid, which is World 1, and I have not verified the later worlds, so I will not guess about them here. Within Sky Grid, the levels get harder by changing the gap and by adding more stones. Levels 1 and 2 had three stones, while Levels 3 to 5 had four stones, and all six levels I played were a single stretch with no flag checkpoint in between. Play in order, because each level teaches you the match rule with a new gap. After you clear a level, the completion screen shows you the solution and the formula, for example a square solution with the line that 2 times R times sin of 180 divided by 4 equals 101.8. Read that screen instead of skipping past it. It confirms why your match worked, and it helps you on the next level. Do not jump to a later level before the earlier one feels clear, because the rule stays the same and only the numbers change.
What A Good Practice Session Looks Like
Here is a session that works for me. First, set one goal only, for example matching Side to Gap on every roll without guessing. Second, play three levels with that goal, checking Gap and Side before every roll. Third, take a short break and note one thing you did well and one mistake to fix. Fourth, play three more levels with the same goal. Do not set five goals at once, and do not play a long tired session, because tired checking leads to guessed rolls and lost stars. If you fall, stop and read the message, adjust the count, and check again before you retry. If you are stuck between two counts, use Footprints once and accept the star cost as a learning cost, then remember the match for the next similar gap. Do this for a few days, in order, and you will start to see the pattern: check, match, roll, read the result. That routine is the real skill in this game, and it is much more reliable than speed.
Common Mistakes And The Fix For Each One
Rolling on a guess is the most common mistake, and the fix is to check Gap and Side and make them equal before every roll. Memorising a shape without checking the numbers is another mistake, and the fix is to remember that the same shape gives a different Side on different levels. Using Footprints on every level is a third mistake, and the fix is to use it only when two counts look close or when you are truly stuck. Rushing a retry after a fall is a fourth mistake, and the fix is to read the fall message, adjust the count, and check again before you roll. Changing the side count in the wrong direction is a fifth mistake, and the fix is simple: if Side is too small, reduce the count for a longer side, and if Side is too large, increase the count for a shorter side. Skipping the completion screen is a sixth mistake, and the fix is to read the solution and formula it shows, because it explains why your match worked. Pick the mistake that sounds most like you, fix that one first, and then move to the next one.
How This Game Differs From Cut The Rope
Both games are played in your browser on this site, but they ask for different skills. In Cut The Rope, you cut a rope, guide candy to a character, collect stars on the way, and deliver the candy to its mouth. That game rewards careful planning and timing of a cut. In the rolling game in this blog, you do not cut anything and you do not steer in real time. You choose a side count, match it to a gap with numbers, and then watch the polygon roll by itself. That game rewards careful reading and matching, not fast reflexes. If you like planning and puzzles, the rope game may feel natural to you. If you like number matching and clear rules, the rolling game may feel natural to you. Trying both helps you learn what you enjoy, and a short break in a different kind of game can also refresh your eyes when a matching game starts to feel hard.
Frequently Asked Questions
Is this a fast timing game?
No. This is a turn based matching game. You choose the side count first, then you press ROLL, and the polygon rolls by itself. Speed does not decide whether you clear a level. Matching Side to Gap decides it.
How do I win a level?
Make Side equal Gap exactly, then press ROLL. Check the Gap and Side numbers on the board before every roll. If they are not equal, change the side count first: fewer sides for a longer side, more sides for a shorter side.
What do Footprints cost?
Footprints cost one star per level. They show green checks where corners will land on stones and red X marks where a corner will land in a gap. Use them only when you are stuck or when two counts look close, because that star will not come back on that level.
What happens when I fall?
The polygon tips into the gap, a message tells you how far you missed by, and you lose one star immediately. Pressing Try again returns you to the same level with the same side count, but with fewer stars. Read the message, adjust the count, check the numbers, and then roll again.
Do I need to download anything to play?
No. You play in your browser, open its game page, press Play Now, and that is all you need to start. The start screen shows Play, Levels, Settings, a sound toggle, and version 2.2, which I saw during my play check.
Final Takeaway
Crossing a gap in this game is not about speed. It is about a match made before you roll. Read Gap and Side, change the count until they are equal, protect your stars by never rolling on a guess, use Footprints only as a paid check, and learn one level at a time in order. Try these practices in your next run, notice which one saves you a star, and practice that one again in the level after that. That is how a simple matching game becomes a skill you can actually build. If you want more games to try, browse All Games and pick one by your mood. If you want to know more about this site, read About Us and see what this site offers.
More Practical Tips
These tips come straight from real play on the CrazyCubix game page.
- Check the Gap and Side numbers before every roll.
- If Side is too small, reduce the side count; if Side is too large, increase it.
- Never roll on a guess, because a fall costs a star that is not restored.
- Use Footprints only when two counts look close, because it also costs a star.
- Read the fall message and adjust the count before retrying.
Level 1 Screenshots From My Own Play
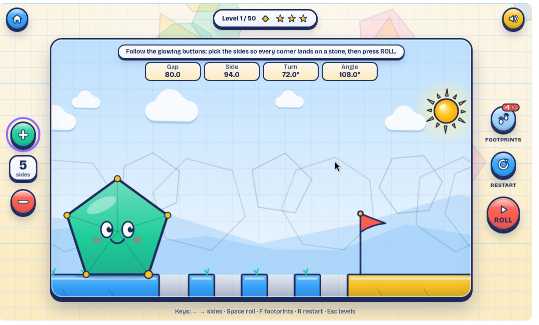
Screenshot from my own play, Level 1 board with 5 sides, Gap 80.0 and Side 94.0, Side does not match Gap yet.
This is why I check Gap and Side before every roll.
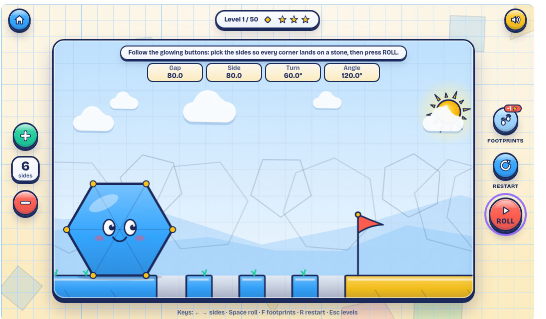
Screenshot from my own play, Level 1 board with 6 sides, Gap 80.0 and Side 80.0, Side equals Gap.
This is the correct count to roll with for Level 1.
Game Instructions Used Here
The rules used in this blog come from the game's own tutorial and the on-screen numbers on the CrazyCubix game page.
- Choose sides from 3 to 12.
- Press ROLL.
- The polygon rolls one side length at a time.
- Clear without a fall and without Footprints for 3 stars.
- Flags are checkpoints where you can change sides for the next stretch.
Related Guides
If you enjoy puzzle games, try Candy Swap Train, a train-themed matching puzzle on this site.
For another shape challenge, play Shape Shifters, a shape-shifting puzzle on this site.